
DNS – Part 5 – DNS-based Authentication of Named Entities (DANE)
Let’s do this.
So basically, you have a wooden browser. That polished, apparently security paranoid, window into the Internet has become rotten at the core and is recognizing security in units of € or $ or £ or …whatever!
Public CAs are a big business, promising maximum security for all, and generate a lot of money as a result.
Since 09/2012, with the appearance of the first implementations of DANE, public CAs basically became obsolete. In many ways getting a certificate from a public CA, ether buying of getting one for free, is like buying a spear to hunt in a world where AK-47s are free, bullets are free and everybody is bullet proof!!!

That does not mean that browsers have caught up with this. Adam Langley, from Chrome, has explained DANE as a matter of meetings and complexity in 10/2012.
“But every bit of code needs to justify its complexity and, for small cases, StartSSL will give you free certificates. Perhaps just Chrome doing it isn’t very interesting, and everyone hacks up custom solutions anyway.”
Just slap a huge this page will eat your brains warning and call it security…bitch! Whatever happened to taking responsibility and being the best? And free certificates from a profit driven company? Is your screen name Sr. LoLsAlOt?
I didn’t want to dismiss him completely because he could have a point… Well, I pretty much knew he didn’t but I wandered….
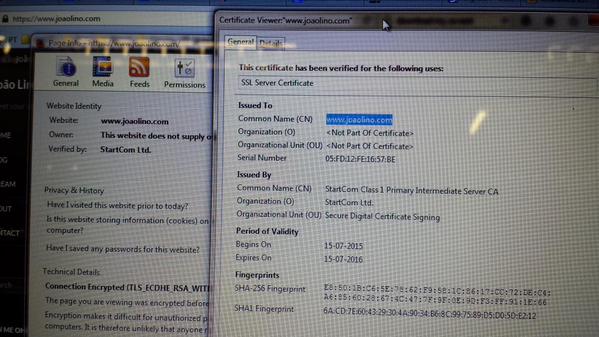
 I got on my way to StartSSL – or StartCom or whatever – and got myself a free certificate. SmartSSL signed the new certificate for my www subdomain and I got exactly what I paid for…
The big thing left out of the “free cert bandwagon” is that different platforms trust different public CAs. Long story short, desktop browsers love SmartSSL …
…but mobile ones don’t.
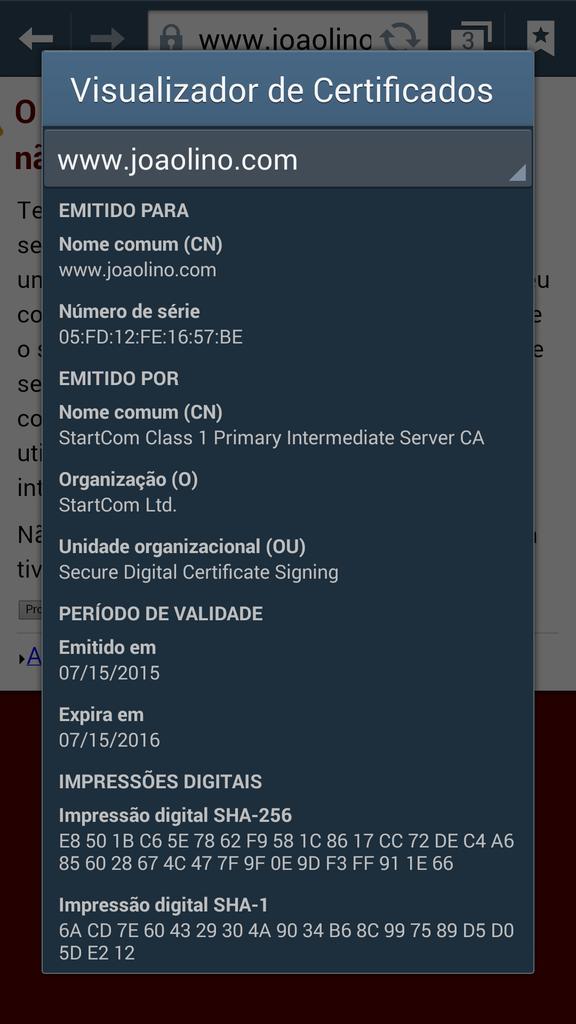
The cool thing about this is that it can happen for paid ones two! BAAM, I was right – free cert equals snake oil!!!
Anyway…

1. Motivation
So, having spent a lot of my time researching security for HTTPS, it was about time to find and commit to a solution essentially to secure the connection from my server to you…yes, you that’s reading!
I wanted to give the best security I could because that’s the responsible thing to do.
…and because it’s cool!
The best I could find was to let your browser have the opportunity to really verify that your HTTPS connection is secure, making available all the information it needed to do the job. The best way I found to ensure this in all platforms is through DANE.
2. Theory
Domain Name System Security Extensions (DNSSEC)
I was witting a very nice definition of what DNSSEC is and midway, buried neck deep in IETF’s RFCs, found just the perfect description at simpledns.com. I’ll quote the basic idea behind it and let you visit them if you’re interested in all the information. It’s very well organized. ^^
“Similar to digital signatures for e-mail, DNSSEC authenticates that DNS records originate from an authorized sender (DNS server) using private/public key cryptography.
The main purpose of this is to protect DNS against falsified information (DNS spoofing).
DNSSEC does NOT encrypt or hide anything – all data is still in “clear text”. Its only purpose is verification of data authenticity.”
Transport Layer Security Address (TLSA)
In DNS lingo, The A in A record stands for Address. Simply put, an A record is used to find the address of a computer connected to the Internet from a name. An A record lets you go from a name to an address like:
www.joaolino.com –> 64.242.87.24
The TLSA record lets you go from a name to Transport Layer Security… in general. It does this by associating the fingerprint of the server’s certificate or a public key with the name of the server, resolved by the DNS.
www.joaolino.com –> [CERTIFICATE]
In reality is more like this:
_443._tcp.www.joaolino.com. 900 IN TLSA 3 0 1 ( 07F03A1978827A802DE104B48FEA1600139BCED6FA6C07A652B9BB413C719A92 )
Why would anyone put this into their DNS zone file? Because DANE!!!
DNS-based Authentication of Named Entities (DANE)
Once again, I found a nice resource on the Internet for this, only this time I searched for it first. The internetsociety.org has a very nice explanation on what DANE is and how the DANE protocol works. I’ll just quote the basic idea here too:
For anyone interested in how to better secure the Internet, the DANE protocol (“DNS-Based Authentication of Named Entities“) provides a mechanism for using DNSSEC to specify precisely which SSL/TLS certificate you want people to use to connect to your web server or other Internet service.
This provides a mechanism for ensuring that you are in fact using the correct certificate and your connection is not being intercepted by anyone in your network path.
No mention of public CAs yet…looks like they are not needed. Now comes the nice part of DANE – you can use certificates from all kinds of CAs, even the old ones you had to pay to get.
It is important to note that the DANE protocol can work perfectly fine with existing TLS certificates issued by Certificate Authorities (CAs). DANE defines four different modes of operation in the “certificate usage” field of a TLSA record:
-
0 – CA specification – The TLSA record specifies the Certificate Authority (CA) who will provide TLS certificates for the domain. Essentially, you are able to say that your domain will ONLY use TLS certificates from a specific CA. If the browser or other application using DANE validation sees a TLS cert from another CA the app should reject that TLS cert as bogus.
-
1 – Specific TLS certificate – The TLSA record specifies the exact TLS certificate that should be used for the domain. Note that this TLS certificate must be one that is issued by a valid CA.
-
2 – Trust anchor assertion – The TLSA record specifies the “trust anchor” to be used for validating the TLS certificates for the domain. For example, if a company operated its own CA that was not in the list of CAs typically installed in client applications this usage of DANE could supply the certificate (or fingerprint) for their CA.
-
3 – Domain-issued certificate – The TLS record specifies the exact TLS certificate that should be used for the domain, BUT, in contrast to usage #1, the TLS certificate does not need to be signed by a valid CA. This allows for the use of self-signed certificates.
So basically, I have to chose one of these modes of operation. Since picking a public CA does not assure me the browser will trust it on every platform, it’s useless to go with either free or paid public CA options.
My best bet is to skip all this nonsense and just have my CA. Then I’ll program the DNS to tell the browser what certificate to use, more or less. Finally, taking a cue from Adam, if the browser is incapable of doing the verification that the certificate the DNS tells it to use, over a secure connection, is the same as the web server is using…then…the browser is just not that interesting…
I choose 3 – Domain-issued certificate.
3. Tools
If you want your browser to actually be able to go through the DANE protocol, there are browser plug-ins you can download to do just that.
Note that this is just verification, the browser will take the same action it did without the plug-in and doesn’t trust the connection. I didn’t try the plug-in with all browsers but with firefox and chrome that was certainly the case, at the time of writing.
Just go here and download the one for your wooden browser.
This also helps in testing!
4. Implementation
4.1 CA
Well…this is a sensible topic and enough material for a single post.
I’ll just leave here a set of basic instructions, that may or may not work for you, as well as they may or may not work for me….
Good ideas here are:
- Create your CA making sure it is unique in everything that it is possible for it to be.
- Only use new 64 char long passwords – randomly generated.
- The system the CA is operated in:
- Does not need to be running all the time
- Cannot have network access – EVER.
- It must be broken into multiple pieces that come together in a way that only you know how to assemble them back together.
- If a hair falls on any piece, whatever that hair is, it must self-destruct!
- Only use signed software you trust to build it.
To give you a simple reference, that is not necessarily what I would do…but does the job… try running these commands. It will get you a CA and you’ll get the basics.
4.2 DNSSEC
First edit the options file to enable dnssec on bind
sudo nano /etc/bind/named.conf.optionsand modify it and add some lines, so it looks like this
acl privatenets {
    10.0.0.0/8;
    172.16.0.0/12;
    192.168.0.0/16;
};

options {
        directory "/var/cache/bind";

        allow-query { any; };
        allow-query-cache { localhost; localnets; privatenets; };
        allow-recursion { localhost; localnets; privatenets; };

        forwarders {
                89.233.43.71;
                89.104.194.142;
                // http://www.uncensoreddns.org/

                //8.8.8.8;
                //8.8.4.4;
        };

        dnssec-enable yes;
        dnssec-validation yes;
        dnssec-lookaside auto;

        auth-nxdomain no;    # conform to RFC1035
        listen-on-v6 { any; };

        listen-on port 53 { any; };
};
Second generate the signing keys, starting with the Zone Signing Key(ZSK)
sudo dnssec-keygen -a NSEC3RSASHA1 -b 2048-K /var/cache/bind-n ZONE joaolino.com
and finally generate the Key Signing Key(KSK).
sudo dnssec-keygen -f KSK -a NSEC3RSASHA1 -b 4096 -n ZONE joaolino.comYou’ll get 2 pairs of private/public keys. These 2 are the files, in /var/cache/bind, well be using in the signing process.
Kjoaolino.com.+007+24228
Kjoaolino.com.+007+47459
Third automate adding keys to private/public zone files and also zone signing, by adding the following commands to the configdns script
sudo nano /usr/local/bin/configdns
add this at the end of the script.
[...]
        # DNSSEC - Add Public Keys to the Zone
        /bin/echo "\$INCLUDE /var/cache/bind/Kjoaolino.com.+007+24228.key" >> /etc/bind/zones/zone.joaolino.com.a
        /bin/echo "\$INCLUDE /var/cache/bind/Kjoaolino.com.+007+47459.key" >> /etc/bind/zones/zone.joaolino.com.a

        # DNSSEC - Sign Zones
        /usr/sbin/dnssec-signzone -3 $(openssl rand -hex 16) -A -N INCREMENT -o joaolino.com -t -K /var/cache/bind -f /etc/bind/zones/zone.joaolino.com.signed /etc/bind/zones/zone.joaolino.com
        /usr/sbin/dnssec-signzone -3 $(openssl rand -hex 16) -A -N INCREMENT -o joaolino.com -t -K /var/cache/bind -f /etc/bind/private/zone.joaolino.com.signed /etc/bind/private/zone.joaolino.com

        # Restart Bind9
        /usr/sbin/service bind9 restart

        named-checkconf
        named-checkzone joaolino.com /etc/bind/zones/zone.joaolino.com
        named-checkzone joaolino.com /etc/bind/private/zone.joaolino.com
fi
Forth tell bind to use the signed zone files you just created for each view/zone.
view "private" {
 match-clients { localhost; localnets; privatenets; };
zone "joaolino.com" {
 type master;
 file "/etc/bind/private/zone.joaolino.com.signed";
 };
};
view "internet" {
 match-clients { any; };
zone "joaolino.com" {
 type master;
 file "/etc/bind/zones/zone.joaolino.com.signed";
// allow-transfer { slaves; };
 };
};
Fifth is testing time. Force a DNS update, through the configdns script, by changing the content of the IP in the zone file containing the last known IP address
echo "lol" > /etc/bind/zones/zone.joaolino.com.ipaddress
Wait a minute or so and run the following commands to check the configurations
$ dig DNSKEY joaolino.com. @localhost +multiline $ dig DNSKEY joaolino.com. @89.233.43.71 +multiline $dig A joaolino.com. @localhost +noadditional +dnssec +multiline $ dig A joaolino.com. @89.233.43.71+noadditional +dnssec +multiline
and you’ll get something like this for each zone if everything was done right.
lol@ap3:~# dig DNSKEY joaolino.com. @89.233.43.71 +multiline

; <<>> DiG 9.9.3-rpz2+rl.13214.22-P2-Ubuntu-1:9.9.3.dfsg.P2-4ubuntu1.1 <<>> DNSKEY joaolino.com. @89.233.43.71 +multiline
;; global options: +cmd
;; Got answer:
;; ->>HEADER<<- opcode: QUERY, status: NOERROR, id: 17693
;; flags: qr rd ra ad; QUERY: 1, ANSWER: 2, AUTHORITY: 0, ADDITIONAL: 1

;; OPT PSEUDOSECTION:
; EDNS: version: 0, flags:; udp: 4096
;; QUESTION SECTION:
;joaolino.com.        IN DNSKEY

;; ANSWER SECTION:
joaolino.com.        243 IN DNSKEY 256 3 7 (
                AwEAAcERvj6zhRhKhBT1T/7yWA4rMC4bYhgXw7KGiLKv
 yT7li+JRRPkgYu2OrcVRppSyyfDJtxMxg3Y4wC9adgZK
 5GFPBfECCY2rpyMEmKmpijPYNCb6r0iz+/I+ODW/m7dS
 HkIweqqbF61K9jyqx2MRLtOSBFa4DdKoRtPDFrHu6gqE
 o6Exru6LLQPjuRbTNGU5DumXoFvHgeKpAjCjanKqFYaI
 uS4fOJ5vdsnB6eFCI5pLnEg1yaOkjaFaoVNrvjo8Pcm6
 IuzJoibwqwn9S+pmQl8pyn11XwBWQvz/o2O6xODxOKzj
 qokRIdYS0h6Fdf2yaHDCGjH8WM/mjGSGzIENksk=
                ) ; ZSK; alg = NSEC3RSASHA1; key id = 47459
joaolino.com.        243 IN DNSKEY 257 3 7 (
                AwEAAdacJp0Ug6Q/9Y6Olm80tBnGBXeXzXgptJfyHwd+
 aoAf0g3fDGXbAOADXxjo1g34/8x54j8rr5iLISQEIqAW
 6yb2buMfqUr8scHtsqdEKwmfIyx0RYtIz7HC9QEUrrFk
 BX8DPNY/l1RNtxLNFRlE0s7kS+MmDPJM2aSVNrdsyCBY
 BqInFzXGAKJzlLwA5R1lEV0Wd9gpGxTTRyVAtam45Sy/
 KfduFB3nXFSfGZz/gjlElp5L3M54aV/+7gYVAYNw8fhI
 6neFAowCS69pWCe0qHuNQJmsEzuMFbGg2MRtDHvweFLp
 7oAYwks6o+mMlCbAsKaXuLcFw5pSbqN275u22G0OEYQK
 uphlQvl06A7MnmazlYZxqwfQp1e8BBXHPNklsPgYdhu+
 GRNmzBnRpfE1MlvYPt6j4KvJ90sFdKcL/eKE7b1buUxC
 sZusJlJBzpzHn16urFr/XtPppUTQrZiRldmabUXwpZJ/
 Fp1uzZ419gslTDzXzu9DZI/viH1YWfrkDY7hsmMD6ibk
 dYVNN/tilngx6xmztSkvgtqPr1X+jHyPs97wulQ1PDoV
 VcdZaPBDZzOdWTAFsXWt65M6UVcaywBZcGSGFPYXb4yA
 BnjKsFhwFIEb58HIE/Thq8x3+8cpkH4Xvz0aRVdf9l2a
Qs9kIk2T7rtjYl8ouJIbmDPAgg8H
                ) ; KSK; alg = NSEC3RSASHA1; key id = 24228

;; Query time: 69 msec
;; SERVER: 89.233.43.71#53(89.233.43.71)
;; WHEN: Sun Jul 19 14:16:00 UTC 2015
;; MSG SIZE  rcvd: 849

lol@ap3:~# dig A joaolino.com. @89.233.43.71 +noadditional +dnssec +multiline

; <<>> DiG 9.9.3-rpz2+rl.13214.22-P2-Ubuntu-1:9.9.3.dfsg.P2-4ubuntu1.1 <<>> A joaolino.com. @89.233.43.71 +noadditional +dnssec +multiline
;; global options: +cmd
;; Got answer:
;; ->>HEADER<<- opcode: QUERY, status: NOERROR, id: 63707
;; flags: qr rd ra ad; QUERY: 1, ANSWER: 2, AUTHORITY: 0, ADDITIONAL: 1

;; OPT PSEUDOSECTION:
; EDNS: version: 0, flags: do; udp: 4096
;; QUESTION SECTION:
;joaolino.com.        IN A

;; ANSWER SECTION:
joaolino.com.        900 IN A 85.246.65.79
joaolino.com.        900 IN RRSIG A 7 2 900 (
                20150815100806 20150716100806 47459 joaolino.com.
                izuAzs4t4AyDBcZKydFdX0jlPuwyEfNV2gj+CFtTk1km
 qZT89eTIUVG8FW+jWsifBp7lcwNAPDVi8R+tmG31oIUs
 c/xmX354fiNcqqklm2EiBR7/lgmia1TdlKKiHC02GGLI
 ouxhFHP89HFPfncIVZ3LUOGev9RUu52yOuilh34y27er
 303Z2FFyRD96ZI0xOHn7MCKFcdh/8ZteOkEznUn0f7bM
 Tifaqb5UCg4GqCLutdduvmG3Lfc8GHv0aSIkQBE0fUGm
 D043X4KQDNxI5HP5fATPrNcIWfjYuQzSky4qtZN39/ml
 pWuupegMxvuFh0CfqZOr6g3oNem66mUzRg== )

;; Query time: 140 msec
;; SERVER: 89.233.43.71#53(89.233.43.71)
;; WHEN: Sun Jul 19 14:16:35 UTC 2015
;; MSG SIZE  rcvd: 357
Sixth comes the boring part – that could be automated out in a next post through the registrar DNS tools API. At the time of writing, mine is GoDaddy.
For these boring instructions I’ll just use a reference I found online – up until the next step.
example.com = joaolino.com
When we ran the dnssec-signzone command apart from the .signed zone file, a file named dsset-example.com was also created, this contains the DS records.
root@master:/var/cache/bind# cat dsset-example.com.
example.com.        IN DS 62910 7 1 1D6AC75083F3CEC31861993E325E0EEC7E97D1DD
example.com.        IN DS 62910 7 2 198303E265A856DE8FE6330EDB5AA76F3537C10783151AEF3577859F FFC3F59D
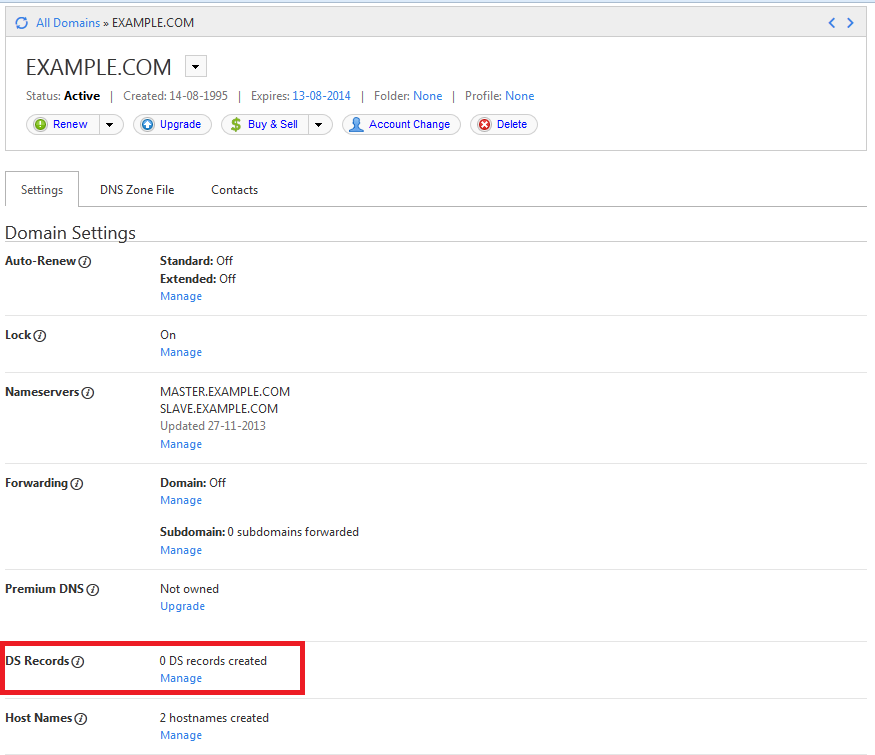
These have to be entered in your domain registrar’s control panel. The screenshots below will illustrate the steps on GoDaddy.
Login to your domain registrar’s control panel, choose your domain, and select the option to manage DS records. GoDaddy’s control panel looks like this.
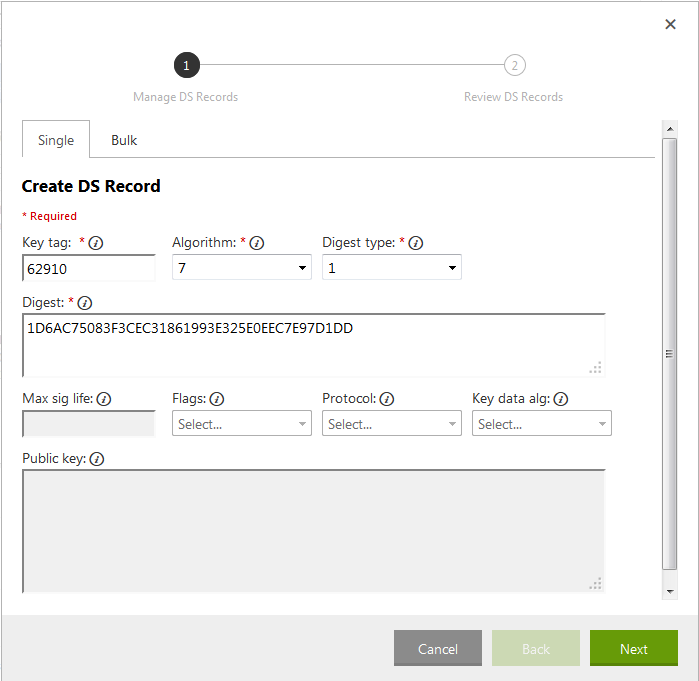
 Here is a breakup of the data in the
 dsset-example.com. file.
DS record 1:
Key tag: 62910
Algorithm: 7
Digest Type: 1
Digest: 1D6AC75083F3CEC31861993E325E0EEC7E97D1DD
 DS record 2:
Key tag: 62910
Algorithm: 7
Digest Type: 2
Digest: 198303E265A856DE8FE6330EDB5AA76F3537C10783151AEF3577859FFFC3F59D
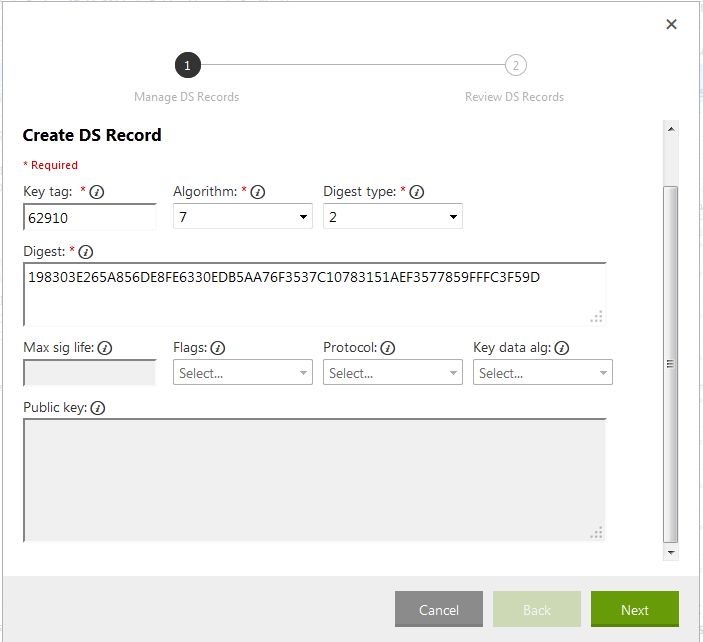 The second DS record in the
 dsset-example.com. file had a space in the digest, but when entering it in the form you should omit it. Click Next, click Finish and Save the records.
 It’ll take a few minutes for these changes to be saved. To check if the DS records have been created query the nameservers of your TLD. Instead of finding the TLD’s nameservers we can do a
 dig +trace which is much simpler.
root@master:~# dig +trace +noadditional DS example.com. @8.8.8.8 | grep DS
; <<>> DiG 9.8.2rc1-RedHat-9.8.2-0.17.rc1.el6_4.6 <<>> +trace +noadditional DS example.com. @8.8.8.8
example.com.          86400   IN      DS      62910 7 2 198303E265A856DE8FE6330EDB5AA76F3537C10783151AEF3577859F FFC3F59D
example.com.          86400   IN      DS      62910 7 1 1D6AC75083F3CEC31861993E325E0EEC7E97D1DD
Once this is confirmed, we can check if DNSSEC is working fine using any of the following online services.
The first tool is a simple one, while the second gives you a visual representation of things. Here is a screenshot from the first tool.
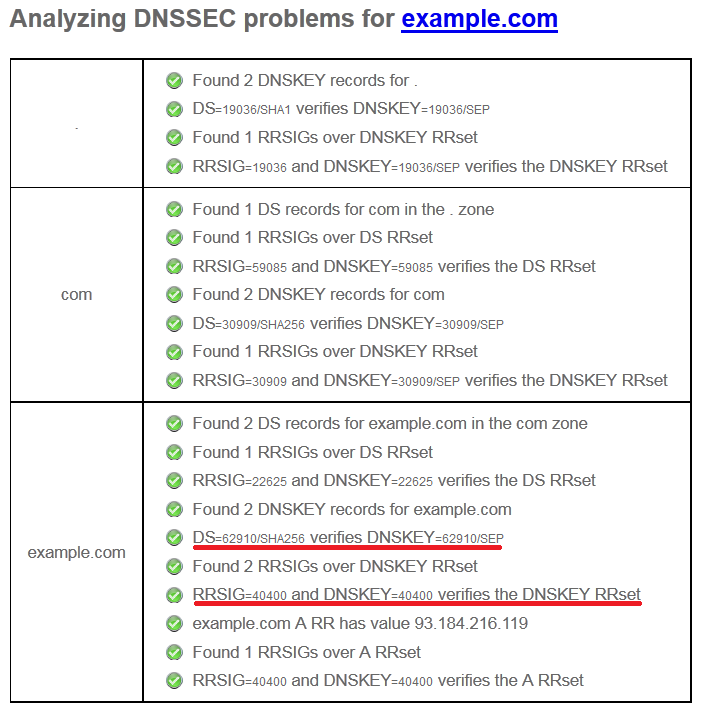 Notice the lines I’ve marked. The first one mentions the Key tag value (62910) of the DS record while the second one key id (40400) of the DNSKEY record which holds the ZSK (Zone Signing Key).
Seventh to prevent zone walking the signature will be renewed every day. To do this, we’ll just fake an IP change and the DNS will re-configure itself, along with generating a new signature and applying it to bind. Soooo….edit the crontab
sudo nano /etc/crontab
and add the following line to re-sign the records every day at 6:36.
36 6 * * * root /bin/echo "lol" > /etc/bind/zones/zone.joaolino.com.ipaddress
4.3 DANE
First you need a certificate – this would be another post.
This has to be done by a CA. If you have yours, it’s time to generate a certificate for the domain name where your website is served from. Mine is www.joaolino.com.
Second you need to place that certificate on your web server and enable TLS (a.k.a. SSL) – this would be yet another post.
Only first and second are done, you’re ready to configure your DNS for DANE.
Third you need to calculate the SHA-256 of your certificate’s fingerprint. To do it, run this command, filling in the path to your certificate.
sudo openssl x509 -noout -fingerprint -sha256 < /etc/apache/ssl/www.joaolino.com.pem | tr -d :
This will get you something like this.
SHA256 Fingerprint=BFEFBE7E7157D66B1F6FF58C1E5BE2B8F7AF92B84130EABA59EEC3D4052650BC
This fingerprint is then going into the zone files. Since the certificate/fingerprint is relatively static automation will not be done.
Forth I’ll generate the TLSA record to all zone files
sudo tlsa --create --output rfc --usage 3 --certificate /etc/apache/ssl/www.joaolino.com.pem www.joaolino.com
getting the following output.
_443._tcp.www.joaolino.com. IN TLSA 3 0 1 07F03A1978827A802DE104B48FEA1600139BCED6FA6C07A652B9BB413C719A92
Fifth open the common zone file, so that the TLSA record generated can be available to all views/zones
sudo nano /etc/bind/zones/zone.joaolino.com
and place it at the bottom of the file, with some additions.
[...]
_443._tcp.www.joaolino.com. 900 IN TLSA (3 0 1 07F03A1978827A802DE104B48FEA1600139BCED6FA6C07A652B9BB413C719A92)
Note that here is where the configuration picked at the beginning comes into action. The 3 is the certificate mode picked for DANE.
The number 1 just specifies the type of fingerprint:
- 0, if the entire certificate is copied into the “hash” argument
- 1, a SHA-256 hash
- 2, a SHA-512 hash
Sixth is testing time. Force a DNS update again.
echo "lol" > /etc/bind/zones/zone.joaolino.com.ipaddress
Wait a minute and checkout the HAD website for testing your setup. You can also use the plug-ins referenced earlier.
BOOM…done!